本文以一个超简明的实例,介绍如何在wordpress后台编辑器Tinymce的工具栏上添加一个按钮,并实现自定义功能。
我们以wordpress插件形式来实现,方便一些。后面提供实例源码下载,重要的部分我写注释里了。
功能规划
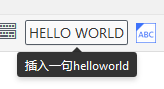
1. 在编辑器工具栏上添加一个文字形式的按钮,点击以后在光标位置插入“Hello World!”。
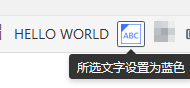
2. 在编辑器工具栏上添加一个图标形式的按钮,点击以后将所选文字颜色改为蓝色。
步骤总结
1. 在wordpress中添加按钮
2. 在js里面写按钮的动作
在wordpress中添加按钮
// 关联js文件
function az_custom_button_scripts($pluarray)
{
    // 这个custom_button必须和后面js文件中tinymce.PluginManager.add("custom_button") 相同
    $plugin_array["custom_button"] =  plugin_dir_url(__FILE__) . "/custom-editor-buttons.js";
    return $plugin_array;
}
function az_add_custom_buttons($buttons)
{
    // 添加按钮名称,与js文件里面 ed.addButton("helloworld") 相同
    array_push($buttons, "helloworld");
    array_push($buttons, "textblue");
    return $buttons;
}
function az_custom_buttons_register() {
    // 校验权限
    if ( ! current_user_can( 'edit_posts' ) && ! current_user_can( 'edit_pages' ) ) {
        return;
    }
    if ( get_user_option( 'rich_editing' ) !== 'true' ) {
        return;
    }
    // 添加钩子
    add_filter("mce_external_plugins", "az_custom_button_scripts");
    add_filter("mce_buttons", "az_add_custom_buttons");
}
add_action( 'init', 'az_custom_buttons_register' );
在js里面写按钮的动作
(function() {
    tinymce.create("tinymce.plugins.custom_button", {

        //url argument holds the absolute url of our plugin directory
        init : function(ed, url) {

            //add new button
            ed.addButton("helloworld", {
                title : "插入一句helloworld",
                cmd : "helloworldCommand",
                text: "HELLO WORLD",
            });
            ed.addButton("textblue", {
                title : "所选文字设置为蓝色",
                cmd : "textblueCommand",
                image : url + "/icons/textblue.png",
            });

            //button functionality.
            ed.addCommand("helloworldCommand", function() {
                var return_text = "Hello World!";
                ed.execCommand("mceInsertContent", 0, return_text);
            });
            ed.addCommand("textblueCommand", function() {
                var selected_text = ed.selection.getContent();
                var return_text = "<span style=\"color: blue;\">"+selected_text+"</span>";
                ed.execCommand("mceInsertContent", 0, return_text);
            });

        },

        createControl : function(n, cm) {
            return null;
        },

        getInfo : function() {
            return {
                longname : "AZ Custom Editor Buttons",
                author : "Aspirant Zhang",
                version : "1"
            };
        }
    });

    tinymce.PluginManager.add("custom_button", tinymce.plugins.custom_button);
})();
实例截图

实例下载
洛杉矶直链: 本地下载
纽约市直链: 本地下载
百度网盘: 云盘下载 密码:qfw4
附
TinyMCE关于自定义工具栏按钮的指引
https://www.tiny.cloud/docs/advanced/creating-a-custom-button/
